Justin Price gets practical and takes you through some corrective exercises to help with neck and shoulder pain.
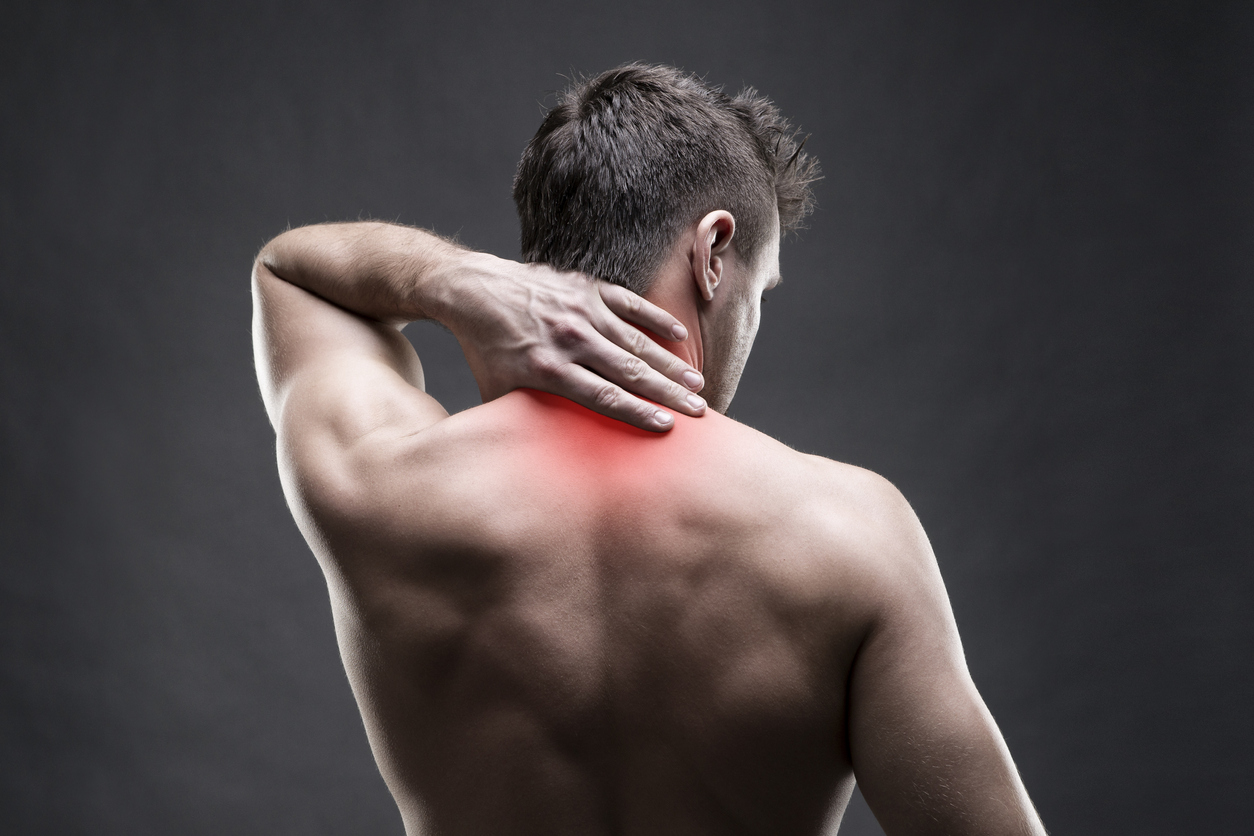
Neck and shoulder pain affects a large percentage of the population. Not only can it disrupt people’s ability to exercise effectively, but it also negatively affects enjoyment of common daily activities like driving, working on the computer, playing sports and even sleeping. In this article, you will learn two practical assessments for identifying the most common causes of neck and shoulder pain and some simple corrective exercises for neck and shoulder pain that you can integrate into your personal training programmes to help both you and your clients to feel and function better.
Assessing the shoulder
The glenohumeral joint is formed where the end of the arm (i.e., humerus) sits into the glenoid (a smooth cup-shaped structure that provides the socket part of the ball and socket joint of the shoulder) (Figure 1)2. The glenohumeral joint is highly mobile and enables movement of the arm(s) in almost any direction. One of these movements in particular (internal rotation) is required on a daily basis for countless activities such as driving, swinging the arms when walking and running, typing on a keyboard, performing push-ups, bench presses, dumbbell presses, cooking and playing most sports that require holding a racket like tennis, golf and baseball3.

Figure 1: Bones of the shoulder
While the arm needs to be able to internally rotate, the shoulder blade should remain fairly stable during these movements. This stability helps form a good base of support for the glenoid so the arm can rotate freely. However, if restrictions in the arm or shoulder prevent the arm from moving freely, the shoulder blade can become destabilised and move excessively to compensate for the lack of range of motion of the arm. Over time, excessive movement of the shoulder blade can lead to tension, dysfunction and pain in the muscles that help move the shoulder blade such as the rhomboids, levator scapulae and trapezius4.
Check arm rotation
To evaluate the ability of the arm to internally rotate, coach your client to stand an arm’s distance away from and facing a wall (Figure 2). Instruct them to raise their left arm and place their left palm flat on the wall with their arm straight and fingers pointing upwards. Have them retract and depress their left shoulder blade and keep their arm straight as they slowly turn their body away from the wall. As they turn, keep your hand on their left shoulder blade to make sure it remains depressed and retracted (i.e., stable). Tell your client to stop turning as soon as their left shoulder blade moves or their left arm bends. If they are able to successfully turn 90° away from the wall without their shoulder blade moving or left arm bending, progress to the next part of this assessment (see below). However, if they are unable to turn their body to 90° without compensating, you know they first need exercises to loosen up the muscles of the arm and shoulder to create mobility in the glenohumeral joint and/or strengthening exercises to help stabilise the scapula before progressing.
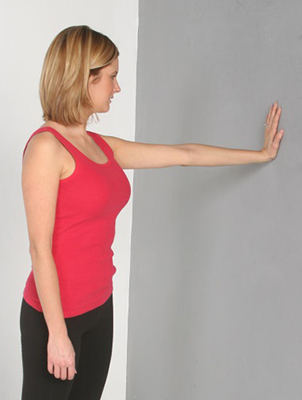
Figure 2: Arm rotation assessment
Once your client can turn their body 90° away from the wall without moving their shoulder blade or bending their arm, coach your client to rotate their left wrist, forearm and upper arm downwards (i.e., internally rotate) without bending their arm or moving their shoulder blade. Evaluate how much they can internally rotate their arm. Ask for their feedback as to which part of their body feels most restricted or deficient in performing this movement. Many people may report feeling tension in the muscles of their arm, while others may indicate an inability to hold their shoulder blade stable. Use this feedback to guide whether the use of self-myofascial release exercises and stretching exercises is needed to help relieve tension or strengthening exercises to help stabilise the scapula are more appropriate for their programme. Perform this assessment on both arms.
Assessing the neck
There are valuable mechanisms contained in our head (e.g., vestibular system and eyes) that help keep us balanced when we move. However, the presence of musculoskeletal imbalances in other areas of the body requires our head to constantly adjust to compensate for those misalignments. For example, someone with a sore foot, ankle, knee or hip on one side of their body may shift their weight to the other side of their body to take stress off the injured/painful part. This uneven weight distribution changes the position of the pelvis and base of the spine, which means the head (and neck) must also shift position to keep the body balanced. Imbalances in the neck and head can lead to pain not only in those areas but in the shoulders and upper back as well, since the neck and upper back are linked via many muscles (e.g., upper trapezius muscles connect shoulder blades to neck and head, levator scapulae muscle connects shoulder blade to neck).
Check neck and head position
To evaluate the position of the neck and head, instruct your client to sit on a chair with their feet firmly on the ground. Place your hands gently on both of their shoulders and coach them to bend their neck to the right as though they are trying to touch their right ear to their right shoulder (Figure 3). As they perform this movement, gently push down on their shoulders so they do not shrug either shoulder and coach them not to rotate their neck and head either forwards or backwards. (This assessment is designed to evaluate movement in the frontal plane: i.e., a side bend of the neck only). Have your client bend their neck and head to both sides and evaluate which direction/side they find easiest. If they find it easier to bend their neck and head to the right, it is indicative that their neck is typically bent in that direction. If they find it easier to bend their neck and head to the left, it indicates their neck is bent to the left. In either case, a bend in their neck means their head is out of alignment too. The results of this assessment can help you to choose self-myofascial release and stretching exercises for the side of the neck that is restricted. Releasing restrictions will create more balanced movement of the neck and head, help centre these structures over the spine, pelvis and legs, and decrease neck and shoulder pain.
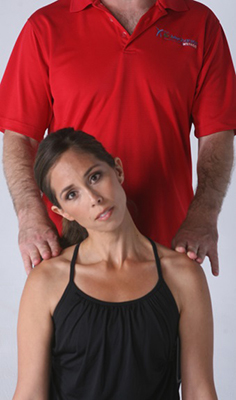
Figure 3: Neck and head assessment
Corrective exercises for neck and shoulder pain
Any corrective exercise programme should begin with strategic self-myofascial release or trigger point massage techniques to loosen up soft-tissue restrictions that might prevent correct movement before progressing to stretching and/or strengthening exercises5,6. Here is a series of self-myofascial release, stretches and strengthening exercises that should be performed in the order shown to help address the imbalances discussed (and assessed) above5.
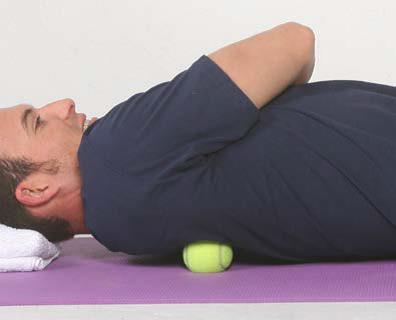
Tennis ball on front of shoulder and arm
This self-myofascial release technique will loosen up the muscles of the chest, anterior shoulder and biceps muscles to facilitate better internal rotation of the arm.
Lie face down on the floor and use a tennis ball, baseball or lacrosse ball to massage the front of your shoulder and biceps. Perform once a day on each side for 10-15 seconds on all sore spots for a total of two to three minutes to help loosen up the arm in the glenohumeral joint.
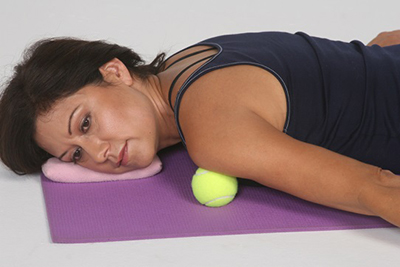
Tennis ball on upper back
This self-myofascial release technique helps rejuvenate and regenerate the muscles responsible for helping depress, retract and stabilise the shoulder blades. Subsequent strengthening exercises should be performed to retrain these muscles to help stabilise the scapula (see Lying Shoulder Retraction exercise below).
Lie on the floor with knees bent and head resting on a pillow. Pull one arm across your chest and place a tennis ball under the shoulder blade of that arm. Find a sore spot and hold to release tension. Move the ball gently to another spot and so on. Hold for 20-30 seconds on each sore spot for a total of two to three minutes on each side. Perform at least once per day, spending more time around the shoulder blade that you found to be the least stable during the Arm Rotation assessment (above).
Theracane on side of neck
This trigger-point technique loosens up the muscles that run from the top of the shoulder blades to the side of the neck and base of the skull. It is designed to help facilitate greater mobility and better alignment of the neck and head.
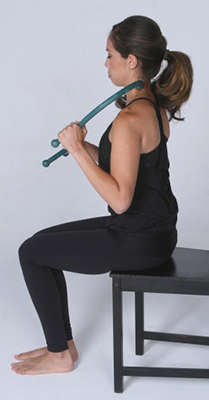
Apply steady pressure to any sore spots from the top of your shoulders to the base of your skull on the side of the neck that is most restricted. Perform for two to three minutes every day and follow up with the Neck Side Bend Stretch shown below.
Neck side bend stretch
This stretch helps realign the neck and head so they are not shifted to one side of the body.
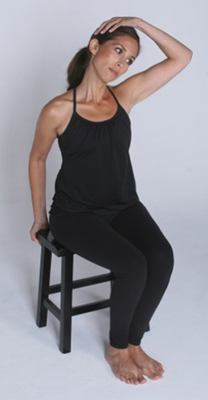
Sit in a chair and grasp the underside of the seat behind your right buttocks with your right hand. Pull right shoulder blade back and down as you use your left hand to pull your left ear towards your left shoulder. Perform stretch on both sides for 10-20 seconds daily. Evaluate which side is tighter and stretch the tighter side two to three times more often.
Biceps stretch
This exercise stretches the biceps muscle while stabilising the shoulder blades to facilitate better internal rotation of the arm and stability of the scapula.
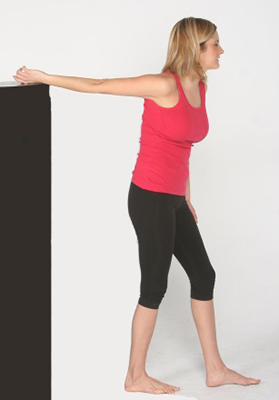
Stand facing away from a high countertop or piece of gym equipment. Lift your right arm behind you, thumb pointed downwards. Pull your right shoulder blade back and down while keeping your right arm rotated to maintain the thumb down position. Gently rotate your body away from your right arm while keeping your right shoulder blade back and down. Perform this stretch on both sides for 15-20 seconds at least once a day. Spend more time on the arm that lacks internal rotation.
Lying shoulder retraction
This exercise strengthens the muscles that stabilise the scapula. The progression of this exercise also helps facilitate internal rotation of the arm in the glenohumeral joint.

Lie on the floor with knees bent and hands out to your sides with palms up. Lengthen the back of your neck by tucking your chin in and pulling your head back to the ground. If you cannot make contact with the ground without tipping your head back, use a pillow. With the neck lengthened, retract and depress your shoulder blades. As you become proficient at this movement, progress the exercise by turning your palms downward (without letting go of the muscles that are retracting and depressing your scapula). Perform three to five times per day, holding each repetition for 10 seconds.
Conclusion
Neck and shoulder pain can not only affect one’s ability to exercise, but severely limits most daily activities. Help yourself and your clients to feel and function better by using your assessment knowledge of what causes these problems and choosing corrective exercises that will help neck and shoulder issues heal and/or reduce the likelihood that these problems will occur in the future.
Explore our sports massage therapist insurance and get covered today.
References
- Yamamoto A et al (2010), Prevalence and risk factors of a rotator cuff tear in the general population, Journal of Shoulder and Elbow Surgery, 116-120.
- Gray H (1995), Gray’s Anatomy, New York: Barnes & Noble Books.
- Price J & Bratcher M (2019), The BioMechanics Method Corrective Exercise Educational Program (2nd Edition), The BioMechanics Press.
- Cook G (2010), Movement,Aptos, CA: On Target Publications.
- Price J (2018), The BioMechanics Method for Corrective Exercise, Champaign, IL: Human Kinetics.
- Rolf IP (1989), Rolfing: Reestablishing the Natural Alignment and Structural Integration of the Human Body for Vitality and Well-Being(revised edition), Rochester, VT: Healing Arts Press.