Yin yoga is said to be an excellent method of stimulating self-healing and has exploded in popularity. Travis Eliot shares a few exercises to help you begin your yin journey.
The laws of a yin pose
The connective tissues, however, are characterised by yin and need to be exercised in a yin manner. So, what makes a yin yoga pose? Instead of a fast, dynamic movement, the connective tissues respond to a slow, sustained hold. Practitioners of yin yoga typically hold a relaxed posture for three to five minutes, which exerts a positive stress on the connective tissues as a way to trigger the body’s natural repair response. This leads to a stronger, more durable and supple body. This method then triggers a set of events that makes the connective tissues stronger, longer and more durable. Because the connective tissue is found in nearly every structure of the body, this is a boon for your overall health and performance capabilities. No matter what yin pose you do, the following three laws will always be present. Any time you work with these three guidelines, you know you are working within the realm of yin. Remember these, now and forever.
Find your edge
When you enter into a posture, you first look for your edge. This is a wall of resistance that keeps you from proceeding further. Trying to force and push through this wall isn’t yin; it is yang. Imagine yourself gently leaning into that wall. Depending on the situation, the wall could indicate tissue tightness or it could indicate anatomical limitations. If anatomy, rather than tissue tightness, is the limitation, then your range of motion has been fully expressed. During the posture, aim for positive discomfort and not bad pain.
Find stillness
Once you find your edge and settle into the sweet spot in the pose, strive for stillness. Stillness is synonymous with yin. Finding stillness doesn’t mean you can’t fine tune and adjust your position. It just means that, if you need to move, do it mindfully. Frequently, our movements are unconscious and reactive. If we are in a pose and experience discomfort, many of us try to distract ourselves from what we are feeling. This could arise as an itch, a desire to adjust clothing or the temptation to pick at our fingernails. You wouldn’t believe the number of people I’ve seen in a yin pose become enamored with their nails. If you need to, make a mental note to set up a mani-pedi appointment, and then come back to your yin practise. Eliminate unnecessary, fidgety behaviour.
Let time flow
Yin yoga is not about quantity; it’s about quality. You may not execute nearly as many poses as in a flow class but that’s not the point. The point is to spend a substantial amount of time in each pose in a deep, concentrated way. The strength of yin yoga comes from this flow of time. The longer you hold, the deeper you go. The deeper you go, the deeper you heal. The deeper you heal, the better you will feel. So being patient is to your benefit. Developing patience is an added bonus of your yin yoga practise. The more patience you have, the less stressed and anxious you will be. So how long do you hold? The magic window of time for holding a yin pose is usually three to five minutes.
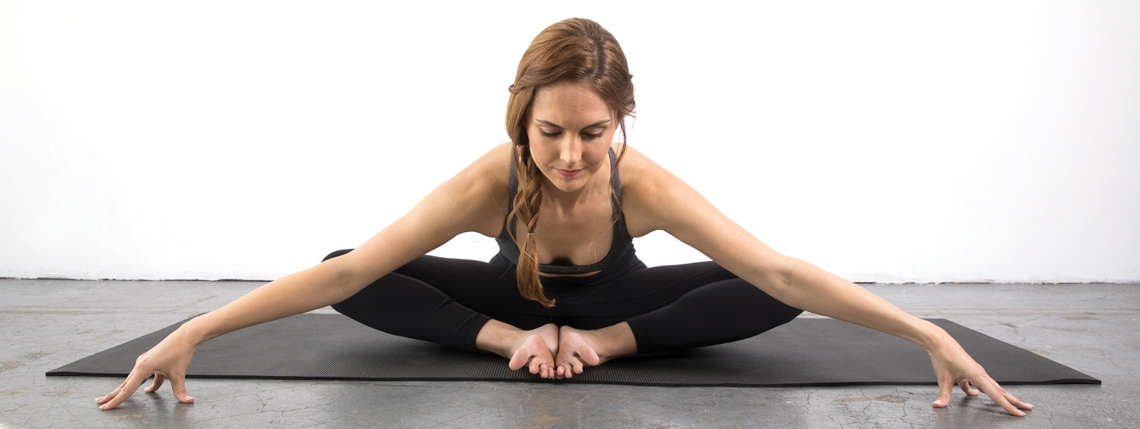
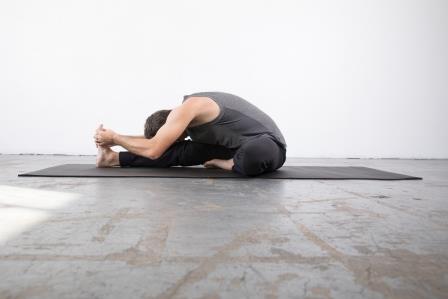
Butterfly pose (See main image in banner above)
Suggested duration
3-5 minutes
Benefits
This pose stretches the hips, inner thighs and groin muscles and can help alleviate sciatica.
Risks and contraindications
Modify or work into the pose with caution if you have low-back pain or knee injuries.
Alignment points
- Begin in a seated position, drawing the soles of the feet together and then drawing the heels towards the body
- Open the knees away from each other
- Grab the outer edges of the feet as you roll the outer hips to the floor
- Fold over, allowing your spine and back to release
- You can keep the hands on the outer edges of the feet or reach the arms out in front along the floor
Modifications and other options
- If you have low-back pain, place a blanket or prop under the sitz bones to elevate the hips
- If you have knee issues, place a block or prop under the outer hips
- If you have a neck injury or excessive tension, you can support the head with a block or bolster under the forehead
(See banner image for pose)
Half-butterfly pose
Suggested duration
3-5 minutes
Benefits
This calming and cooling posture elongates the spinal muscles, hamstrings and glutes.
Risks and contraindications
Modify or work into the pose with caution if you have a history of knee injuries.
Alignment points
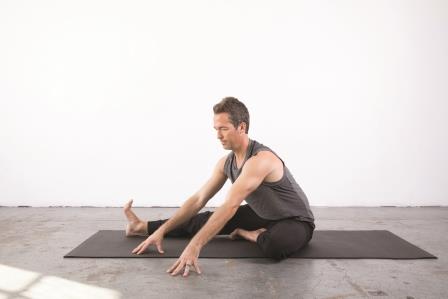
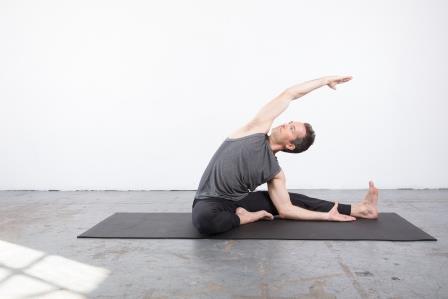
- Begin in a seated position and extend one leg straight forward, with the extended foot gently flexed
- Bend the opposite knee and press the sole of the foot into the inner upper thigh of the extended leg
- Reach the arms overhead, draw up through both sides of the waist and fold from the crease of the hips while lengthening the sternum forward
- Grasp the foot or shin of the extended leg and relax in the forward bend
- Repeat on the other side
Modifications and other options
- If you have knee issues, place a blanket under the bent knee for support
- For more of an inner-leg stretch, rotate the torso so it is facing between the thighs and then crawl the hands out along the floor (image 1)
- For a great side stretch, turn the chest to face the same direction as the bent knee, rolling the top ribs open to the sky; one arm reaches along the inseam of the extended leg while the other arm reaches upwards or outwards (image 2)
(image 1)
(image 2)
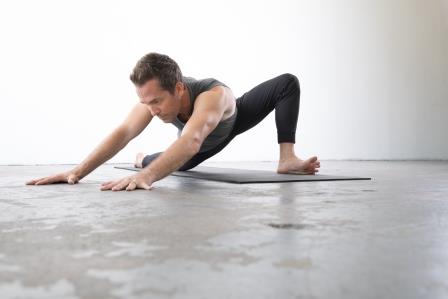
Dragon pose
Suggested duration
2-5 minutes
Benefits
This pose stretches the psoas, hip flexors and quadriceps, and can be good for relieving sciatica. It is also beneficial for the pelvis.
Risks and contraindications
Modify this pose if you have knee pain or tight ankles.
Alignment points
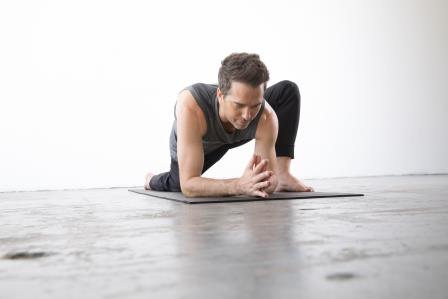
- Begin on all fours with the spine in neutral position and step one foot forward, stacking the front knee directly above the front ankle
- Allow the back knee to rest on the mat
- Slide the knee along the mat so it is behind the sitz bones
- Draw the chest forward and broaden the collarbones while relaxing the hands on top of the front thigh
- Repeat on the other side
Modifications and other options
- If the back knee feels as though it’s grinding into the floor, place a blanket under it to provide extra cushion and comfort
- To lessen the intensity of the pose, place the hands on top of blocks for support
- To increase the intensity, use low dragon pose by bringing both hands to the inside of the front foot, and sliding the front foot a little toward the outside edge of the mat
- Bend both elbows, allowing the torso to drop down toward the floor (image 1) and, if needed, place a block under the forearms for support
- For an even deeper stretch, move into low-angled dragon pose by rolling onto the outer edge of the front foot, letting the knee flare outward, then keeping the torso low, crawl away from the foot and toward the opposite edge of the mat
- Reach the arms out and allow the chest and head to relax down toward the floor (image 2); repeat on the other side
(image 1)
(image 2)
Did you know FitPro provide insurance for yoga professionals online?